|
Having trouble viewing this email? View it in your browser.
|

|

New Partner Program

Monnit is proud to introduce IoTvantage™, the Premier Internet of Things Partner Program. The program provides business partners (Distributors, Value Added Resellers, System Integrators, Independent Software Vendors, Managed Service Providers and OEMs) a fast track for connecting their customers to industry-leading IoT solutions. Market-ready kits are a key component of the new IoTvantage program. These kits allow distributors and resellers to stock or drop-ship “off-the-shelf”, application specific kits that require less than 5 minutes setup time.
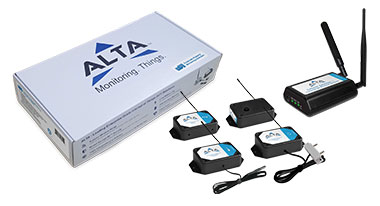
The following ten kits are available today:

Learn More About The Monnit IoTvantage™ Partner Program »
|
In this issue
|
|

|

|
|
New Wireless Thermocouple Sensors
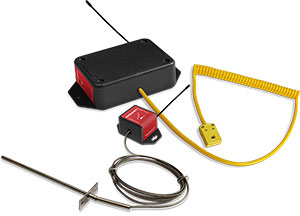
We are excited to announce the availability of our new Wireless Thermocouple Sensors. The Wireless Thermocouple Sensors are available with a hardwired thermocouple or K-type connector to support various thermocouple types and ranges. The hardwired thermocouple option measures temperatures up to 1100°C (2012°F). These new sensors are available in coin cell, AA and Industrial formats for both standard Monnit and ALTA platforms.
Features:
- Available in Standard Monnit and ALTA platforms
- Available with hardwired thermocouple or K-type connector
- Hardwired version measures temperatures up to 1100°C (2012°F)
- Pigtail version supports standard K-type thermocouples
Learn more about Monnit Wireless Thermocouple Sensors
Learn more about ALTA Wireless Thermocouple Sensors
|

|

MonnitLink USB
Product Being Discontinued
With the advanced feature set of Monnit's newer USB Pro gateway, we are discontinuing the original USB gateway (dongle version). We will continue to support the original USB gateway in the iMonnit software, however, no more will be manufactured. If you would like to purchase or stock up on this product, we suggest that you act quickly as we have a limited supply left.
To order this product, visit https://www.monnit.com/products/gateways/wireless-sensor-adapter/usb/ or call a Monnit sales representative today.
|

|
|
|

|
|
"We have an in house monitoring system…very expensive, hard wired into the building when it was built a few years ago. Last night Monnit told me my freezer was going down at 8:00pm. I received a call from our maintenance company at 1:15 am after the freezer was a complete loss. Your system just sells itself!"
– Cameron L., Colorado
|

|
Take a look in our crystal ball to see what the future holds at Monnit
Monnit's development team is hard at work developing new products for our customers. One of the new products nearing completion is a remote thermostat. Monnit's thermostat will be different than typical thermostats found today, as it is designed specifically for remote configuration. There will be no manual adjustment buttons which will prevent the cooling or heating system from being tampered with or left in an energy wasting state. It will also feature an integrated motion sensor to auto detect if the area is occupied or not. The system will allow you to set a max and min temperature range for both occupied and non-occupied states as well as standard time settings. This is a perfect solution for remote buildings that are typically unoccupied, to auto adjust comfort levels when personnel arrive and automatically return to normal when they leave. It is also great for corporate buildings, schools and churches to prevent random adjustments by unauthorized people and auto detect occupants to adjust comfort levels. It also provides cost savings by allowing the cooling or heating system go into a power saving mode if an area is not in use. If you would like to learn more about this product or be notified when it becomes available, please email us at sales@monnit.com.
back to top
|
|

|

Remote Monitoring Solutions for Boats & Yachts
There are numerous things you want to know about your boat or yacht when you are not there. Boat bilge pump failure can be catastrophic when it comes to your boat or watercraft staying afloat. Maybe you want to go out on the water this weekend, do you know if the battery is still holding a charge? Monnit wireless sensors can let you know the moment an issue arises and help you keep your vessel in top condition.
Monnit provides a low-cost, reliable, wireless monitoring solution that allows you to track and receive alerts for the following types of applications:
| Cellular Gateway |
Provides cellular connectivity for your boat's wireless sensors, allowing you to monitor 24/7 from anywhere. |
|
| Water Detection Sensors |
Monitor water in the bilge. Detect if water reaches a certain level and the pump has not turned on, indicating a pump issue. |
|
| Voltage Meters |
Monitor and track the voltage of boat batteries and know if you need to bring a spare along. |
|
| Motion Detection Sensors |
Monitor and detect motion in and around boat. |
|
| Temperature Sensors |
Know about extremes in temperature which could cause damage. |
|
| Average Cost |
$350-$450 for a gateway and 4-5 sensors. |
|
| Typical Setup Time |
Less than 15 minutes. |
|
| Battery Life |
Up to 10 years. |
|
| Benefit |
Knowing about issues with your boat as they happen.
Peace of Mind! |
All Monnit wireless sensors come with free basic online monitoring, allowing you to view sensor information anytime from anywhere. Receive instant notifications via email or SMS text if a set sensor condition is met or exceeded.
Protect Your Boat and Wallet with Monnit Wireless Sensors!
Learn More About Solutions for Boat Monitoring »
back to top
|
|

|

by The WiSe Guys
|

Using the Monnit Local Alert
The Monnit Local Alert is a device capable of receiving notifications and sensor readings from your iMonnit sensor network, and alerting you where someone is most capable of responding to a critical condition. When the Local Alert receives a notification it can set off an audio/visual alarm comprised of a loud 90 dB buzzer, an ultra-bright red flashing LED, and an LCD display capable of showing a custom message.
In addition to alerting, the Local Alert can also display recent sensor readings from any sensor on the same account. Sensor readings, unlike notifications, do not cause alarms to trigger, do not display automatically, and cannot override notifications already saved in memory. The Local Alert can save up to 10 notifications or sensor readings in memory at any given time. If it exceeds 10 notifications the oldest notification is deleted. Notifications take priority over sensor readings in the memory so when memory is full and a new notification is received sensor readings are deleted before deleting notifications. If the memory is full of notifications sensor readings will be ignored until there is an unoccupied memory slot or a slot with an older sensor reading.
After the alarm sounds, the user can view the notification message and clear the alarm by pressing the button. The button can also be used to clear notifications and reset the device.
Adding the Local Alert to your wireless sensor network
The Local Alert can be added to your sensor network through the iMonnit online sensor monitoring software the same way wireless sensors are.
Do not power the Local Alert on until it has been assigned to a network and a wireless gateway on the same network is already active.
Steps to add a wireless Local Alert to your sensor network.
- Choose "Manage" from the main navigation.
- Select the network you would like to add the device to.
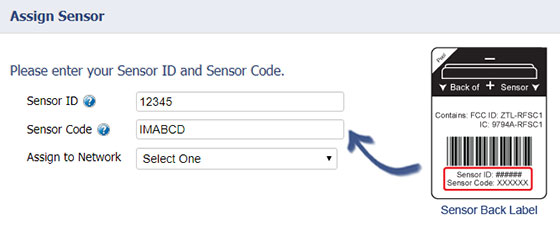
- Click the "Add Sensor" button.
- Enter the ID and Security Code from the back label of the Local Alert.
- Press the "Assign Sensor" button.
- Once the Local Alert has been added to your network, power cycle your gateway to ensure that it will recognize the Local Alert.
- Power the Local Alert by attaching and plugging in the power supply or inserting batteries, then turn the power switch to on.
- The LCD will display the message, "LINKING…"
- If the LCD displays the message "LINK FAILURE" then press the button after the message disappears to force the Local Alert to retry linking or cycle the power using the power switch.
- Once linked to a gateway, in the iMonnit online software, verify that data is being received by viewing the device's history tab in iMonnit.
Configuring the Local Alert
In the iMonnit edit tab for the Local Alert there are several configurable options.
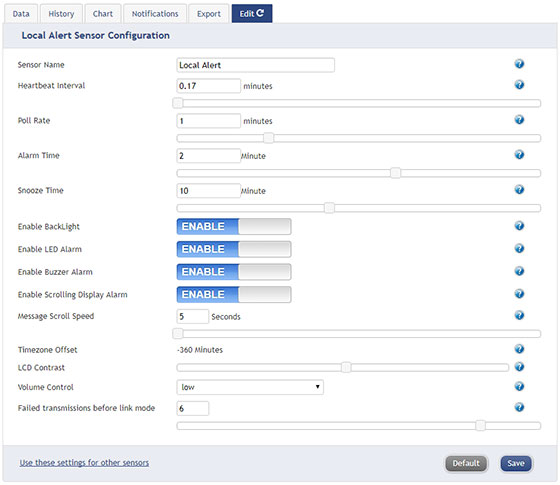
| Heartbeat Interval: |
How often the Local Alert checks in with the server. |
| Poll Rate: |
How often the Local Alert checks the gateway for notifications. |
| Alarm Time: |
How long the alarm sounds before it snoozes. |
| Snooze Time: |
How long the Local Alert snoozes before alarming again. |
| Enable Backlight: |
This controls the LCD backlight when displaying time and when scrolling messages during alarms. |
| Enable LED Alarm: |
Enables flashing LED in the Alarm On state. |
| Enable Buzzer Alarm: |
Enables buzzer alarm in the Alarm On state. |
| Enable Scrolling Display Message: |
Enables notification messages in the Alarm On state. |
| Message Scroll Speed: |
How long a message is displayed in the Alarm On state before scrolling to the next message. |
| Time Zone Offset: |
Sets the time on the Local Alert to the same time as the
account. |
| LCD Contrast: |
Allows you to adjust the contrast level of the LCD screen. |
| Volume Control: |
Allows you to adjust the volume of the buzzer alarm. |
| Failed Transmissions Before Linkmode: |
How many missed transmissions can occur before the local alert device tries to relink and possibly find another gateway. |
Setting Notifications / Alerts Features
- Notifications can be associated with the Local Alert by selecting the Local Alert device under the Devices to Notify tab in the notification settings. Activate alerting to the device by clicking the icon to the left of the local alert name. A green icon means it is active for the alert, a grey icon means it is not active.
- Once active, various alarms can be enabled by clicking on them (green = active). From left to right the icons are; LED Alarm, Buzzer Alarm, and Display Alarm.
- Changes made in this screen take effect immediately there is no save button that needs to be pressed.

If you would like additional information on using the Monnit Local Alert, please view the User's Guide.
For more information on using Monnit wireless sensors, visit the support section of our website.
back to top
|
|
|

|
 |
|
All trademarks are property of their respective owners. © 2017 Monnit Corp. All Rights Reserved.
Monnit Corporation / Phone: 801-561-5555 / www.monnit.com

|
|