Serial Modbus Gateway—RX Timeout! Error
When you configure the ALTA Serial Modbus Gateway, you may see an error indicating “RX Timeout!” The error can occur after setup and when you send a command or poll to the Serial Modbus Gateway. It indicates there is a communication error and is generally a result of a configuration or wiring issue. This article will provide steps for troubleshooting this issue.
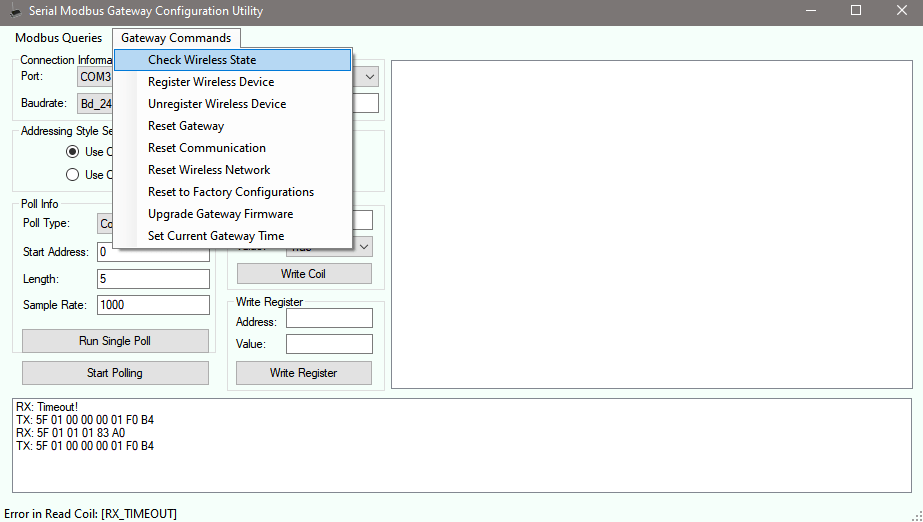
To check the gateway’s communication response with the Serial Modbus Gateway Utility, select Gateway Commands > Check Wireless State. If there is a communication error, you will see the error in the log toward the bottom of the window.
Steps to Resolve
STEP 1—Confirm the wires from the gateway are connected to the USB dongle as per the following image.
If the wires are already connected to the dongle, remove and reconnect them, being sure to check for broken wires, which can be a common issue.
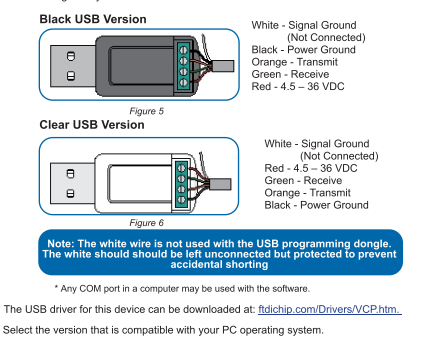
Connect to a USB Programming Dongle
Monnit provides Modbus configuration software that presents a GUI and makes
interfacing to the Serial Modbus Gateway easy. Monnit also provides a USB to RS485 dongle to
connect the hardware to a PC. To use the USB to RS485 dongle, connect the wires from
the Serial Modbus Gateway as shown in the illustration above.
White—Signal Ground (Not Connected)
Red—4.5 – 36 VDC
Green—Receive
Orange—Transmit
Black—4.5 – 36 VDC
The white wire is not used with the USB programming dongle. The white should be left unconnected but protected to prevent accidental shorting.
Any COM port in a computer may be used with the software.
The USB driver for this device can be downloaded at: ftdichip.com/Drivers/VCP.htm
Select the version that is compatible with your PC operating system.
STEP 2—Download the most recent version of the Serial Modbus Gateway Configuration Utility V3.2 here.
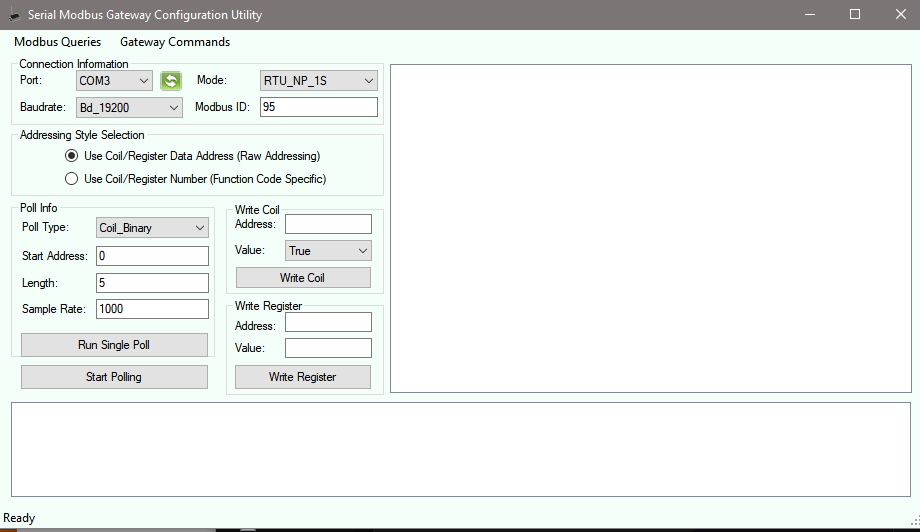
STEP 3—Confirm the Serial Modbus Gateway Configuration Utility V3.2 has the following configurations:
Mode: RTU_NP_1S
Baudrate: Bd_19200
Modbus ID: 95
STEP 4—Be sure the RS-485 USB Dongle is plugged into a USB port on the computer (preferred over USB Hub) where it can received power. Swap ports if needed.
STEP 5—Confirm you are operating in the Windows 8 or 10 operating system.
STEP 6—Confirm the Driver is version 2.12.28.0.
- The setup executable for the correct driver version can be found here.
- Launch the Device Manager (steps for this can be found here).
- Locate the category Ports COM & LPT and expand.
- Locate the USB Serial Port (COMx) item, right click, and select Properties.
- Click the Driver tab.
- Confirm the Driver Version is listed as 2.12.28.0.
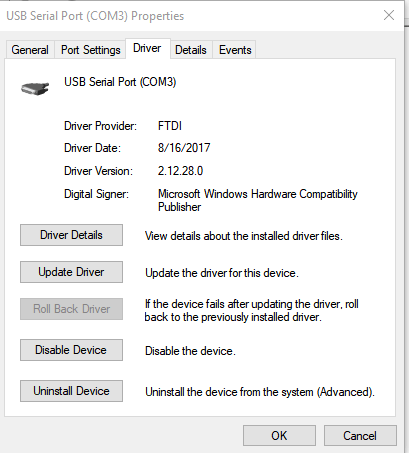
If you see a different version of the driver, proceed to uninstall and delete the existing driver version. The step for this can be found here.
The manual installation driver files can be found here.
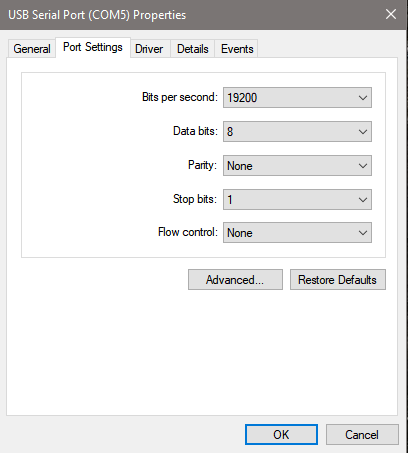
STEP 7—Set the Baud Rate and other configurations of the USB Dongle to 19200
In the USB Serial Port (COMx) Properties > Port Settings tab, enter the following configuration, then select OK.
- Bits per second: 19200
- Data bits: 8
- Parity: None
- Stop bits: 1
- Flow control: None
STEP 8—Confirm the Jumper is off. (Jumper on is RS-232, which is not supported by the RS-485 dongle.)
As per page 7 of the Serial MODBUS Gateway User’s Guide, confirm the Jumper is off. No Jumper is RS-485, jumper on is RS-232C.
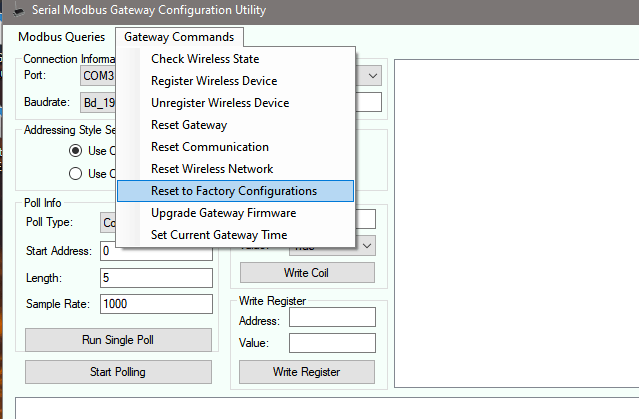
STEP 9—If the issue persists, reset the gateway to the default settings.
In the Serial Modbus Gateway Utility, select Gateway Commands > Reset to Factory Configurations. Go through the steps above to test again.
This will clear out existing sensors that have been added to the Wireless Device List.