iMonnit—Add Multiple Devices to a Network
With the appropriate permissions, you can add multiple devices to a Network in iMonnit. Download a CSV template in iMonnit (accessible using Microsoft Excel or similar spreadsheet application), add your sensor IDs and Security Codes, save the template, and then upload it to iMonnit. This will add all of the devices in the list of the template to the Network selected in iMonnit.
Create the Template for Uploading Multiple Devices
To accomplish this, please follow the steps below from a User with adequate permissions to create a template that includes all devices you wish to upload to a single Network:
- Log into iMonnit.
- Select Networks (this can also be performed from the Sensors or Gateways menu).
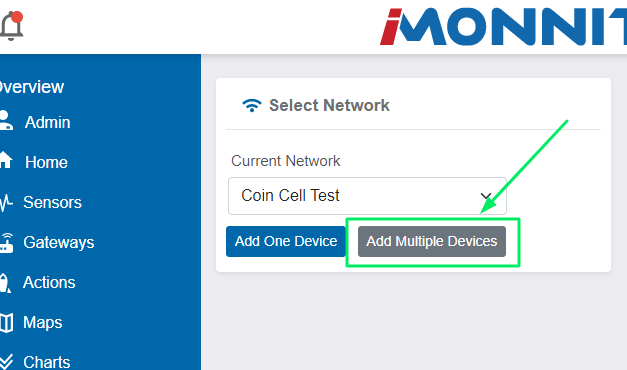
- Select the Network to which you are adding the devices.
Click the Add Device to Network+ button toward the top right of the Network pane.

Select Add Multiple Devices.
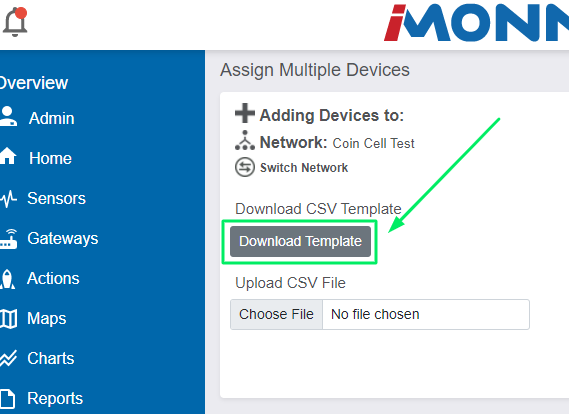
Select Download Template.
Enter the IDs and Security Codes for all sensors you wish to batch upload to your iMonnit Account/Network in the appropriate DeviceID and SecurityCode columns; save the template locally.
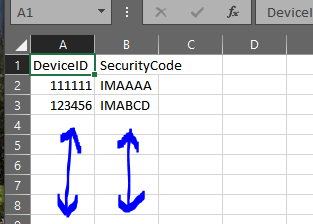
In some scenarios, customers may operate with scanners which can incorporate with your spreadsheet program to allow for quick addition of the IDs and SCs to the template.
Add the Devices to the Account/Network
Once the template has been created, you can upload the template to add the devices to a Network in your iMonnit Account using the following steps.
- Log into iMonnit with a User that has the appropriate permissions to add devices.
- Select Networks in the navigation menu.
- Select the appropriate Network.
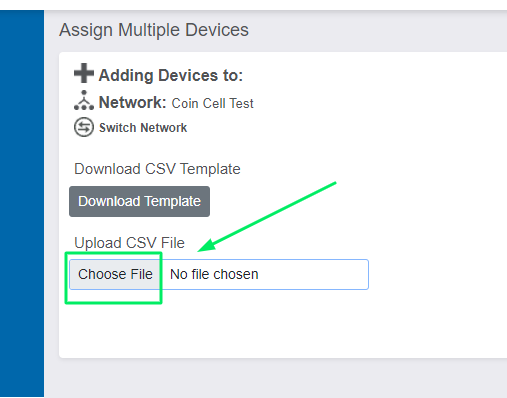
- Select the Add Multiple Devices+ button.
Select the Choose File button in the Upload CSV File field.
- Navigate to the CSV file saved in the previous section.
- Select the file.
- Select the Upload button toward right hand side of the page.
- iMonnit will attempt to upload all of the devices on the list to the selected Network.
- Select Finished Adding.
If the sensor was available to be added, it will be added and you will see a message indicating they were successfully added. There may be scenarios in which a sensor in the list cannot be added to the Network. In this scenario, you may see an error indicated X Failed Devices.
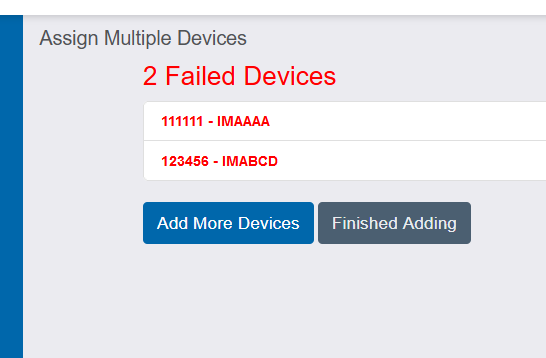
If you see X Failed Devices
Devices that already belong to another Network in iMonnit
Only devices that are not currently added to another Network will be added to the current Network. You will want to check if your device has already been added to another Network. In some cases, the device may have been added to another Account, in which case a User from that account will need to remove it before it can be added to another Network.
Reaching the Sensor Limit on your iMonnit Account
If you reach the Sensor Limit, you may encounter an error which indicates the devices cannot be added. In this case, you will need to upgrade your iMonnit Premiere subscription with a Sensor Limit to accommodate the number of sensors being added.
Multiple devices in iMonnit Enterprise
iMonnit Enterprise has a bit different operation when it comes to adding devices to the database the first time. While the feature to add multiple devices is supported in iMonnit Online, there is a consideration whether your Enterprise Server has a connection to iMonnit Online or not when adding devices in Enterprise. If your Enterprise Server does not support an Internet connection, you must first follow the steps in this article regarding using the XML file when adding devices to your Enterprise Server for the first time.