Duct Temperature Sensor Installation Guide
Sensor Overview
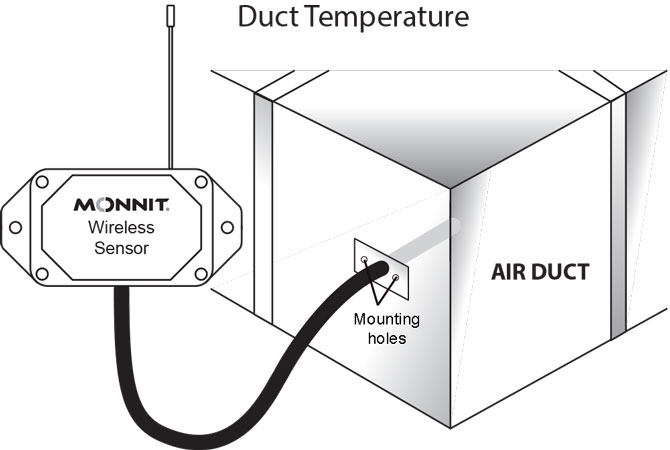
The ALTA Wireless and Power over Ethernet (PoE) PoE•X Duct Temperature Sensor uses an NTC thermistor with an 8-foot lead wire to accurately measure temperatures in ductwork while maintaining a sealed environment.
Specifications:
- Accurate to ± 1° C (± 1.8°F)
- Increased accuracy by user calibration to ± 0.25° C (± 0.45° F)
- Probe temperature range of -40°C to +150°C (-40°F to +302°F)
- 8 ft UL listed plenum cable
Installation Steps
If this is your first time setting up your Monnit system, you must first set up your iMonnit account and connect your ALTA IoT or Ethernet Gateway to iMonnit before registering your sensor. See this article for steps outlining how to get started: Creating an iMonnit account.
Step 1.
Remove the sensor from the package. If installing an industrial sensor, attach the antenna.
Step 2.
Register the sensor in iMonnit. Do not install the batteries until told to do so in iMonnit.
Step 3.
Determine the sensor’s installation location. We recommend placing the sensor in the location and making sure it reports to the gateway before final installation. See this article if you’re using an ALTA Site Survey Tool to perform a site survey to determine sensor installation location.
If installing a PoE•X sensor, ensure there is sufficient cable to reach the sensor.
Step 4.
Using a 1/4" drill bit, drill a hole in the ductwork for thermistor placement. Insert the thermistor and mark the location of the two mounting holes. Drill out the mounting holes.
Step 5.
After ensuring that the sensor is communicating with the gateway, mount the sensor using the supplied screws or double-sided tape.
Step 6.
Mount the lead end to the ductwork using the supplied screws.