Motion Sensor Installation Guide
Sensor Overview
Motion & Occupancy
The Wireless Motion Detection Sensor detects motion and movement using a passive infrared (PIR) motion sensing element. The element detects relative changes in temperature caused by people or animals moving through the viewing area. Once the sensor detects movement, it communicates with the iMonnit Online Sensor Monitoring and Notification System. The iMonnit cloud platform stores all data where it can be reviewed and exported as a data sheet or graph. You can set up notifications in iMonnit to alert you when motion is detected.
Motion + Humidity and Temperature
The ALTA Wireless Motion+ Sensor combines the power of monitoring the movement of people or animals with measuring ambient temperature and relative humidity (RH). If the sensor detects movement or your preset temperature or RH threshold is breached, it reports this data to the iMonnit Online Sensor Monitoring and Notification System via an ALTA Gateway. You can set up notifications in iMonnit to alert you when the sensor detects motion, temperature, and RH changes. The iMonnit system stores all data so it can be reviewed and exported.
Installation Steps
If this is your first time setting up your Monnit system, you must first set up your iMonnit account and connect your ALTA Gateway to iMonnit before registering your sensor. See this article for steps outlining how to get started: Creating an iMonnit account.
Step 1.
Remove the sensor from the package.
Step 2.
Register the sensor in iMonnit. Do not install the batteries until told to do so in iMonnit.
Step 3.
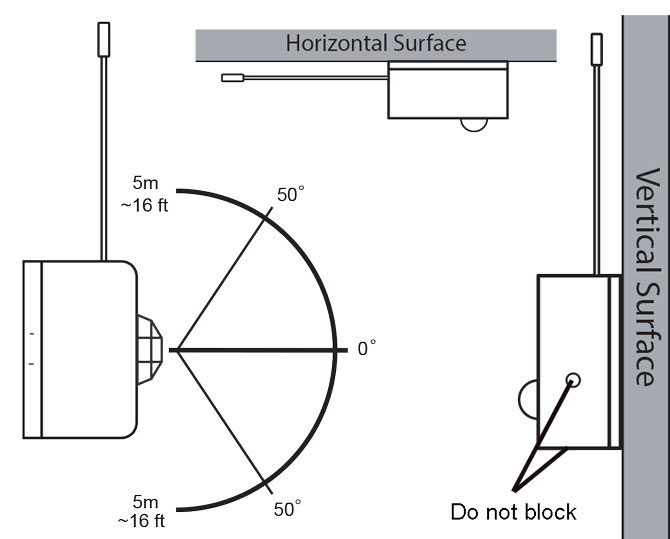
Determine the sensor’s installation location. See the image below to understand the sensors viewing angle to help determine where to place the sensor.
We recommend placing the sensor in the location and making sure it reports to the gateway before final installation. See this article if you’re using an ALTA Site Survey Tool to perform a site survey to determine sensor installation location.
If you are installing a Motion+ Sensor, mount the sensor in a location that will not block or impede air flow to the holes the sides and bottom of the sensor.
Step 4.
After ensuring that the sensor is communicating with the gateway, mount the sensor using the supplied screws or double-sided tape.