Propane Tank Level Sensor Installation Guide
Sensor Overview
The ALTA Wireless Propane Tank Level Monitor allows a user to remotely track the propane levels in tanks by simply plugging the R3D® (Remote-ready) sensor into a pre-installed R3D tank gauge. As the propane level decreases, the reading produced decreases as well. The sensor converts the reading into a percentage of propane remaining in the tank and transmits that percentage wirelessly to its connected ALTA Gateway. The percentage depends on the configuration of the tank and the R3D gauge pulling an accurate propane level inside.
Tank gauges that are not R3D ready can be upgraded with an R3D gauge from one of these vendors:
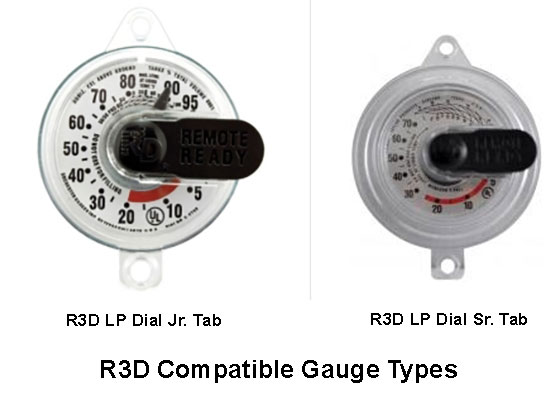
Warning: If you do not have a dial that is R3D compatible, do NOT attempt to change the dial yourself. Please contact your propane supplier and ask them for a replacement dial that supports the R3D standard. The float gauge inside the tank does not need to be replaced, just the plastic dial that reports the propane level inside the tank. (Compare your dial to those in the following images and verify which one is installed on your tank. If it is R3D-ready, please proceed.)
R3D Gauge Information
The ALTA Propane Tank Level Sensor supports both Jr. and Sr. R3D Gauges. The sensor doesn’t support anything outside of this specification.
Installation Steps
If this is your first time setting up your Monnit system, you must first set up your iMonnit account and connect your ALTA Gateway to iMonnit before registering your sensor. See this article for steps outlining how to get started: Creating an iMonnit account.
Step 1.
Remove the sensor from the package and attach the antenna.
Step 2.
Register the sensor in iMonnit. Do not turn the sensor on until iMonnit tells you.
Step 3.
Determine the sensor’s installation location. We recommend placing the sensor in the location and making sure it reports to the gateway before final installation. See this article if you’re using an ALTA Site Survey Tool to perform a site survey to determine sensor installation location.
Step 4.
After ensuring the sensor is communicating with the gateway, mount the sensor to the tank using the supplied magnets in a location that will leave enough room for the 6-ft. lead to connect to the gauge.
Step 5.
Insert the lead from the sensor into the gauge. Align the black tip of the lead with the grooves of the gauge, then slide together. A successful connection will result when you hear a click.
