Water Detection Sensor Installation Guide
Sensor Overview
The Monnit ALTA Water Detect and Detect Plus Sensors monitor the presence or non-presence of non-combustible liquids, mainly water, in areas that may be prone to pooling or flooding from weather and plumbing leaks.
If a Water Detection Sensor’s lead contacts water or detects its absence, an internal circuit is completed. This triggers the sensor’s integrated radio to send water status data to iMonnit, instantly alerting you via text, email, or call.
Installation Steps
If this is your first time setting up your Monnit system, you must first set up your iMonnit account and connect your ALTA Gateway to iMonnit before registering your sensor. See this article for steps outlining how to get started: Creating an iMonnit account.
Step 1.
Remove the sensor from the package. If installing an industrial sensor, attach the antenna.
Step 2.
Register the sensor in iMonnit. Do not install the batteries until told to do so in iMonnit.
Step 3.
Determine the sensor’s installation location. We recommend placing the sensor in the location and making sure it reports to the gateway before final installation. See this article if you’re using an ALTA Site Survey Tool to perform a site survey to determine sensor installation location.
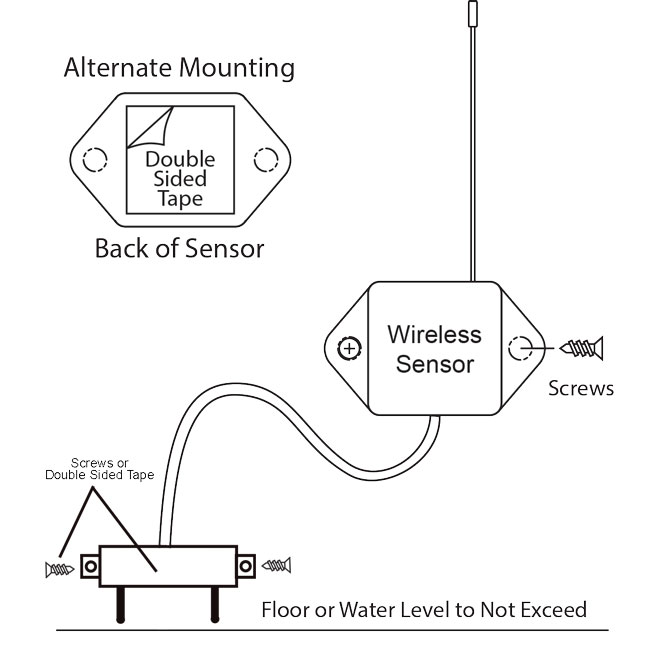
Step 4. (Water Detect Sensors)
Mount the sensor using the provided screws or double-sided tape. Ensure you leave enough room to place the leaded end at the desired height.

Mount the detection wires (using tape, glue, or method of your choosing) to the desired height for water detection. For example, if no water is ever supposed to be present, mount the lead, so the wires are touching the ground. If a 1/4" of standing water is acceptable, mount the lead, so the wires are not higher than a 1/4". Similarly, if using the sensor to detect the non-presence of water, mount the lead to the desired detection height.
Step 4. (Water Detect Plus Sensors)
Mount the sensor using the provided screws or double-sided tape. Ensure you leave enough room to place the leaded end at the desired height.
Mount the detection end (using tape, screws, or method of your choosing) to the desired height for water detection. For example, if no water is ever supposed to be present, mount the lead to touch the ground. If a 1/4" of standing water is acceptable, mount the lead no higher than a 1/4". Similarly, if using the sensor to detect the non-presence of water, mount the lead to the desired detection height.