Push Data with a Webhook
As an iMonnit Premiere user, you can have Monnit push sensor readings to your database with our external configuration tool. Pass data from your wireless sensor network to another service in real-time. This is done by coding the data into a URL query and then sending the data via an HTTP request when the data is received. An extensive list of parameters can be passed, allowing you to send detailed information about the data and the sensor.
Setting up a Webhook
- Open iMonnit.
- Navigate to Settings on the primary menu. Select the link for API / Webhook located in the top corner.
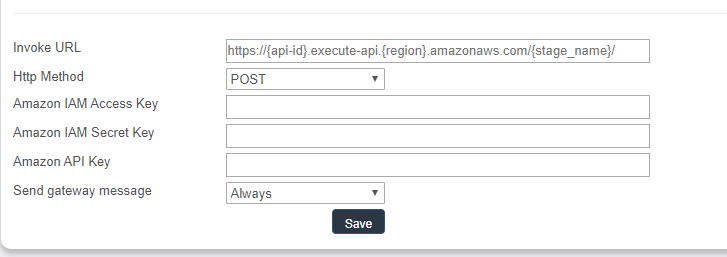
- The Data Push Info page will open. A Data Push sends data to your endpoint when data is received at the server. You can configure the destination and query parameters used to route the request. Data is compiled as a JSON body and sent via HTTP POST. There are four (4) endpoints available now. Webhook, Amazon AWS, Microsoft Azure IoT Hub, and IBM Watson. Only one (1) data push is allowed per account.
- Select the Create Tab.
- Note: If you have an existing data push, this tab will read Edit. You must end the current data push to see the Create tab.
- Open the dropdown menu on the Create Data Type page and select Amazon AWS.
- The page to configure Amazon AWS will open.
- This pushes data to your Amazon API Gateway endpoint when data is received at the server. Create an Amazon API Gateway POST in your AWS console to represent this connection. AWS Signature Version 4 is required for authentication. All sensors and gateway message data will be pushed to this endpoint. Data is sent as JSON. Amazon Web Services, AWS, and API Gateway are trademarks of Amazon.com, Inc. or its affiliates in the United States and other countries.
- The Invoke URL must follow the format: https://{api-id}.execute-api.{region}.amazonaws.com/{stage_name}/{your additional parameters (optional)} (See the picture below for reference)—the forward slash after {stage_name} is required.
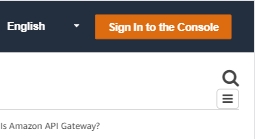
- Open a new browser tab or window and enter the following URL: https://docs.aws.amazon.com/apigateway/latest/developerguide/welcome.html
- Select the button Sign In to the Console in the top right-hand corner of the Amazon API gateway.
- If you already have an Amazon Web Services account, log in. If not, choose the Create a new AWS account button. Then, follow the on-screen directions to create an account. You will need a credit or debit card handy to create an account. Unless your usage exceeds the AWS Free Tier Limits, Amazon won't charge you.
- Once inside your AWS account, select the desired API.
- Go to stages.
- Select the stage in which you have deployed your API.
- Input the Invoke URL in the text box on the Configure Amazon Page in iMonnit. This is the location you want to send the data.
- Go back to the Amazon AWS tab. Navigate to API Keys. Then select Rules. Finish by selecting Create API Key.
- Enter the Amazon API Key in the text box on iMonnit.
- Move on to Send Gateway Message: You decide if you want ALL gateway messages sent to you or only messages that contain a message from your sensor. Gateway messages can be none or multiple. Failed messages are indicated by a red X. You may only have one webhook per account. Every message on your account will be relayed through this webhook.
- Save your configuration.
The tab that used to read Create now reads Edit. The new data push must be ended for the Create option to be displayed again.
You’ve created an API Webhook with Amazon AWS.